| Borland C++ 5.5
What is Borland C++ 5.5?
Inprise Corporation, [also known as Borland], the makers of Delphi, Turbo Pascal, and C++ Builder, will let you freely download and use their C++ 5.5 compiler. This is Borland's latest ANSI/ISO C++ compiler, the same compiler that is used in C++ Builder 5. BCC55 comes with everything you need to compile and link both console-mode and GUI programs that will run on Windows 95/98/NT/2K. Your programs will not run on Windows 3.1 or DOS machines however. BCC55 does not come with an Integrated Development Environment [IDE]. Instead, you write your source code using a text editor, such as Windows Notepad or SciTE. You then compile, link, and run your programs from the command-line. [That is, a DOS Window.] Borland also provides the text-mode Turbo Debugger as a separate [free] download. The rest of this page will walk you through the steps necessary to download, install, and run your C++ programs using Borland C++ 5.5. You'll also learn how to configure the SciTE programmer's editor to compile and run your programs without returning to the command line.
Downloading and Installing Borland C++ 5.5
You can download the necessary files from home over the Internet. If you have a slow connection at home [a modem] you can download all of the files below from the OCC Computing Center local area network. Because of the size of the files, you'll need to use a ZIP disk to save the program if you download it in the Computing Center.
Compiler
You can download the compiler, linker and basic command-line tools from this link. The latest version [August 24, 2000] is 5.5.1. You'll have to register, but registration is free: http://www.borland.com/bcppbuilder/freecompiler/ The compiler program is about 9MB.
Other Downloads
A good source of information about the Borland command-line tools can be found on Helmut Pharo's site in Germany. (Note: the site has been down for some time, so the link below is to an unofficial mirror.) http://www.sirma.bg/Jogy/Pharo/bcc55.html Borland also offers some other downloads you might be interested in. Many of them have very little to do with the command-line tools, and are quite large. Here are some you might want someday: You can download the TurboDebugger from this link. As with the compiler, you'll have to register, but registration is free: http://www.borland.com/bcppbuilder/turbodebugger/ You can download the Standard C++ Builder Help file from this address: ftp://ftp.borland.com/pub/bcppbuilder/techpubs/bcb5/b5std.zip Much of this large [7.75 MB] file contains material unrelated to the command-line tools, but you might find the C++ language and Standard C++ Library reference useful. You can download a set of FAQs [Frequently Asked Questions] from this link. As with the documentation bundle, the majority of the material is not relevant to the command-line compiler. http://community.borland.com/downloads/ti-faq/cpp-faq.zip
Installing and Configuring the Tools
Once you have downloaded the compiler, you will need to install and configure it. Fortunately, this is fairly easy if you follow these directions.
Step 1: Install the Tools
The procedures that follow assume that you will install the command-line tools in a directory named C:\BCC55. If you want to install somewhere else, simply change the path when following these instructions.
|
A. Use Windows Explorer to find the file you just downloaded. This is a self-extracting file, so you won't need WinZip to install the tools. Simply double-click the file. | | |
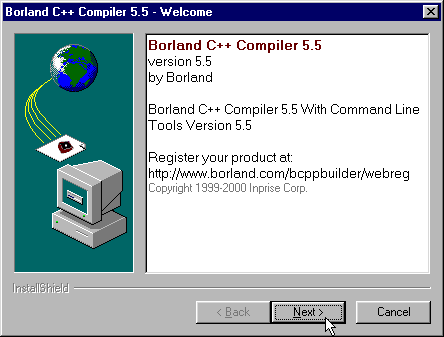
B. Double-click the file FreeCommandLineTools.exe. This will launch the InstallShield installation program. When the first screen pops up, just click Next... | |
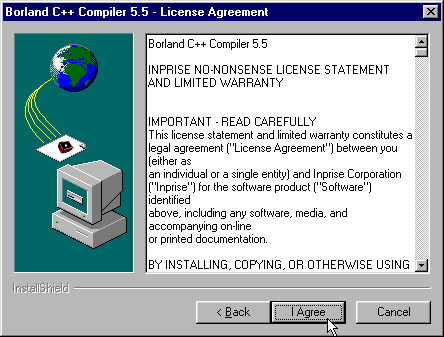
C. The next screen is the license screen. Read through the license and then click
"I Agree". | |
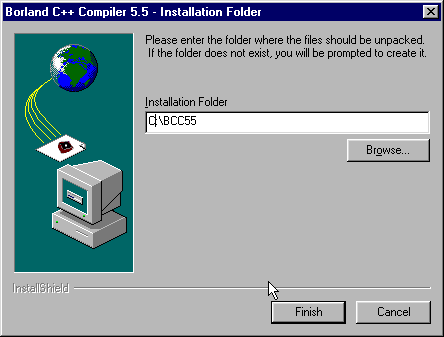
D. The next screen asks you to enter the name for the Installation Folder. There's nothing really wroing with the default [C:\Borland\BCC55], but I've shortened it to C:\BCC55 as previously mentioned. | |
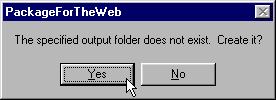
E. Unless you are reinstalling, the folder you specified will not exist. Answer Yes when asked if you want to create it. | | |
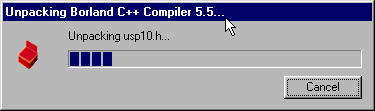
F. Once you click OK, the installation program will uncompress each of the files and place them in the directory you specified. As it works, it will keep you updated with a progress dialog like this. | |
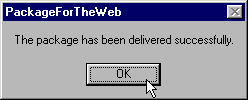
G. Once it has uncompressed all of the files, the installer will notify you like this. Click OK and your done. | |
Step 2: Configure the Tools
Before you can use the compiler you need to configure the tools for your machine. This process requires you to tell the operating system [Windows] where the executable files are, and to tell the compiler where the include and library files are located. You'll also need to tell the compiler if you want to pass any special switches. To configure the tools we'll write one batch [BAT] file and two CFG files. [This assumes you are using Windows 95/98. If you are using NT, W2K, or XP, you can write a CMD file instead of a BAT file, but a BAT file will work as well.]
| An Alternative to Creating StartBC.bat | | Strictly speaking, you don't need the batch file at all, if you want to modify your system environmental variables. To do this in Windows 95/98/ME, modify the file C:\AUTOEXEC.BAT, and add the lines shown in Step 3A below. In Windows NT/2000/XP, you modify the path settings using the System Properties dialog, which you open from the Control Panel. Select the Advanced page on the dialog, and then click the Environmental Variables button at the bottom of the page : 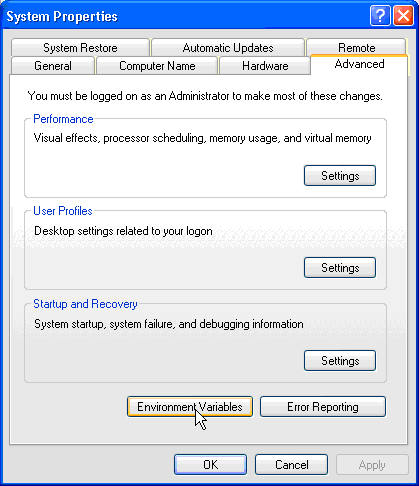 On the Environmental Variables page, locate the Path variable in the System Variables section, and click the Edit button like this: On the Environmental Variables page, locate the Path variable in the System Variables section, and click the Edit button like this: 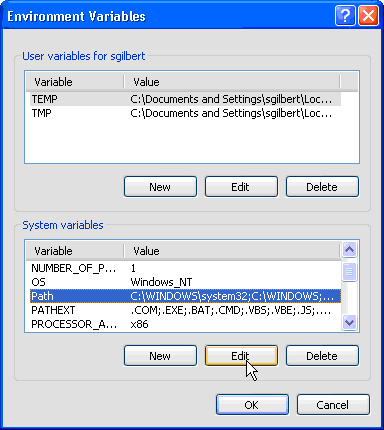 Add a semicolon to the end of the existing path, and follow the semicolon with the path to the C:\BCC55\bin directory. Add a semicolon to the end of the existing path, and follow the semicolon with the path to the C:\BCC55\bin directory. | We'll start by writing the batch file to configure the environment:
A. StartBC.bat
|
1. Open Notepad from the Start Menu. It's located under Accessories. | | |
2. Before you make any changes, save the empty file as StartBC.bat in the C:\BCC55 directory. If you are running Windows NT or W2K, save the file as StartBC.cmd instead. Be sure you put quotes around the file name when you save it, or else Notepad will save your file as StartBC.bat.txt. | 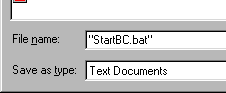 | |
3. Add the following two lines to your batch file, and then save it again. |  |
B. bcc32.cfg
|
1. While you still have Notepad open, select New from the File menu. This creates a new blank document in Notepad. | | |
2. Before you make any changes, save the empty file as bcc32.cfg in the C:\BCC55\BIN directory. Note that this is not the same directory where you saved StartBC.bat. Be sure you put quotes around the file name when you save it, or else Notepad will save your file as bcc32.cfg.txt, which won't work at all. | 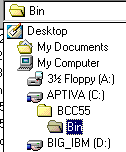 | |
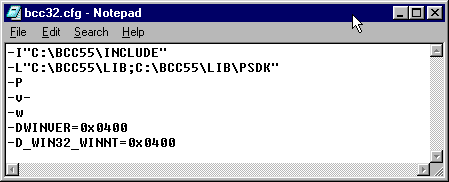
3. Add the following lines to your file, and then save it again. Note, however, that if you've installed the compiler in a directory other than C:\BC55\BIN, you'll need to adjust the lines so that they reflect the actual location of the compiler's include and library files. | | If you're interested, here's what each of these lines means: - -I : tells the compiler where to look for system include files
- -L : tells the compiler where to look for libraries
- -P : tells the compiler to compile using C++, even if the source ends with .c
- -v-: tells the compiler to turn off debugging.
- -w : tells the compiler to issue warnings
- -D : defines several constants so your executables will work with W95/98/NT
Note that the I, L, P, and D are uppercase, while the v and w are lowercase. This is important, because if you use an uppercase W, you generate a Windows application instead of warnings. |
C. ilink32.cfg
|
1. While you still have Notepad open, select New from the File menu. | 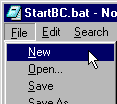 | |
2. Before you make any changes, save the empty file as ilink32.cfg in the C:\BCC55\BIN directory. Note that this is not the same directory where you saved StartBC.bat. Be sure you put quotes around the file name when you save it, or else Notepad will save your file as ilink32.cfg.txt. | | |
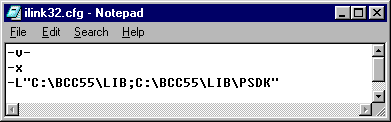
3. Add the following lines to your file, and then save it again. Note, however, that if you've installed the compiler in a directory other than C:\BC55\BIN, you'll need to adjust the lines so that they reflect the actual location of the compiler's include and library files. | | If you're interested, here's what each of these lines means: - -L : tells the linker where to look for libraries
- -v-: tells the linker to turn off debugging.
- -x : tells the linker not to generate a map file.
|
Step 3: Create a Shortcut
You should create a shortcut on the desktop to run the compiler. Here's are the instructions for Windows 95/98:
|
A. Find an empty space on the desktop and right-click. Choose New>Shortcut from the context menu that appears. | 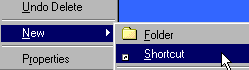 | |
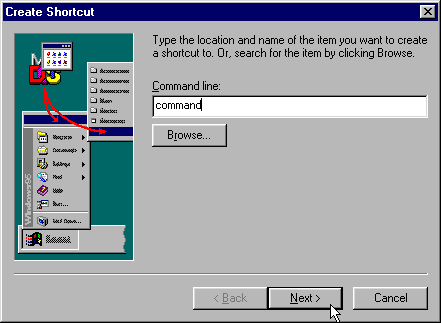
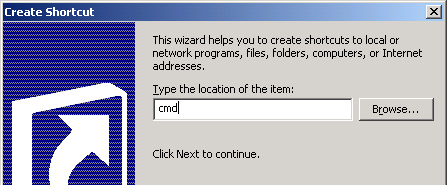
B. For Windows 95/98, type the word command when asked which program to run. Then click Next. For Windows NT, XP, or 200 [shown here], type the word cmd instead like this: | |
C. Type in a name for the shortcut, and click Finish: | |
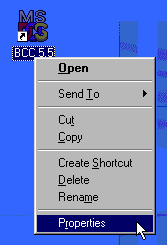
D. Right-click the shortcut on the desktop and choose Properties from the context menu. | | |
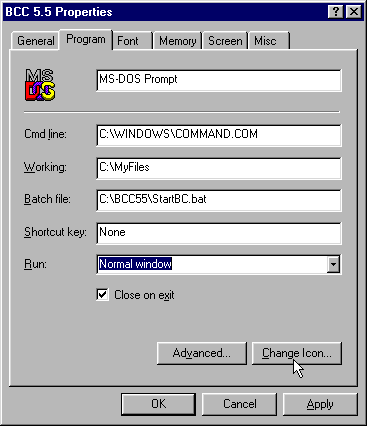
E. For Windows 95/98, when the shortcut properties dialog appears, switch to the Programs tab and change the following two entries: - Set the Working directory to the name of the directory where you want to store your source-code [C++] files. I have a directory called MyFiles. [Make sure that this directory exists.]
- Set the Batch File entry to C:\BCC55\StartBC.bat. This is the same file that you created earlier.
Once you're finished, click the "Change Icon" button. For Windows NT/2000/XP, you'll see that the Shortcut dialog does not have a text-area where you can enter a batch file. Instead, of placeing C:\BCC55\StartBC.cmd in the Batch File text-area, place it in the Target text-area, following the text that already exists. Then, type a slash-k ( /k ) between the existing text and the batch file. Here's an example using Windows XP. The Dialog for NT and 2K is similar.
| |
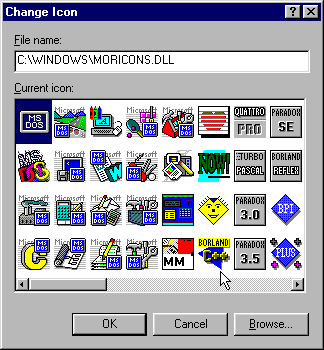
F. When the Change Icon dialog appears, click the Browse button and look for the file named MORICONS.DLL . In Windows 95/98/ME you'll find it in the Windows directory; in NT/2K/XP, it should be in the Windows\System32 directory. Once you open the file select the Borland C++ icon from the list. [This isn't necessary, of course. You can use any icon you like.] Once you're finished, click the "OK" button. Close the Properties dialog as well. |
Checking Your Installation
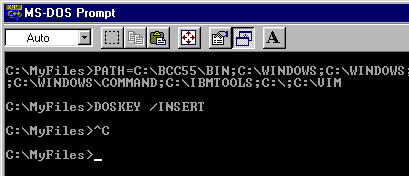
Once you've installed BCC, simply double-click the icon on your desktop to initialize the compiler. You should see something that looks like this. You'll see a different set of directories in your PATH statement than shown here, but it should start with C:\BC55\BIN; If, instead, you get an error message, double-check each of the previous steps.
2. Check the Paths
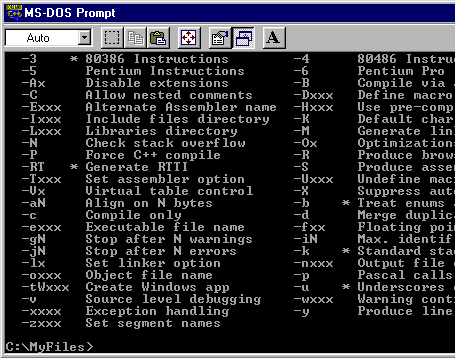
Next, you'll want to make sure that the compiler is actually working. To do that, you'll run the compiler and pass it the "Help" switch. At the prompt, simply type: bcc32 and press Enter. You should see a list of compiler options like this: If you don't, then check the first line in your batch file and make sure it points to your compiler's BIN directory.
3. Create the Source
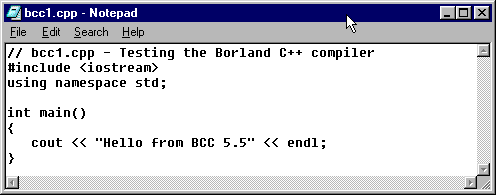
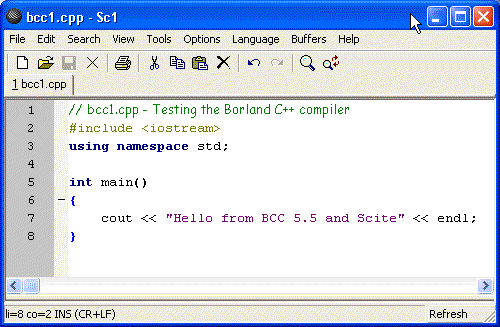
From the command-line, type: Notepad bcc1.cpp and press ENTER. This will launch the Notepad program using the filename bcc1.cpp. [When Notepad asks you if you want to create the file, answer "Yes".] Type in and save the following program, being very careful with spelling and punctuation:
3. Compile and Link
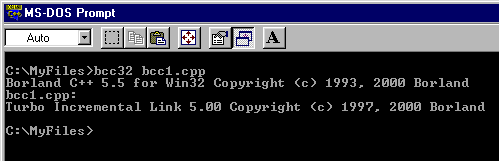
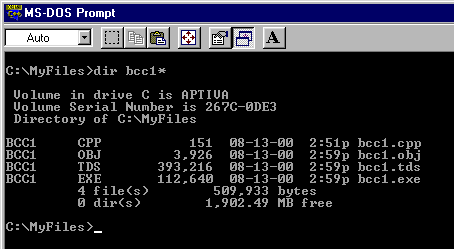
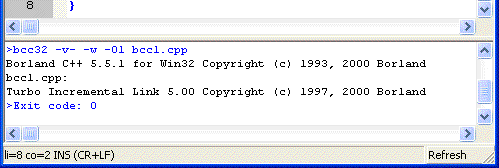
Once you've saved your file, return to the command-line, and type: bcc32 bcc1.cpp and press ENTER. This will launch the compiler and the linker. If you haven't made any mistakes, this is what you'll see: The compiler and linker produce several different files. If you use the DIR command, you should see something like this: The large file with the extension .TDS consists of Turbo Debugger Symbols. Even though we turned debugging off, the linker still creates a dummy file. With debugging on, however, the file is much larger. You can safely delete this file if you like. The file with the extension .OBJ is the compiled machine code before linking. After combining library code and startup code, the .OBJ file becomes an .EXE.
4. Dynamic Linking
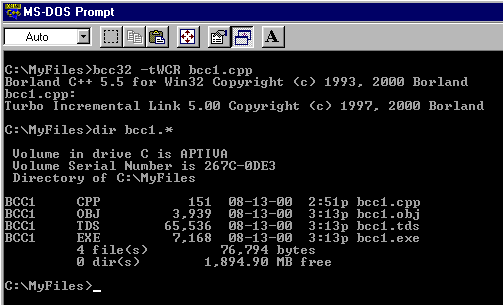
You can make your code considerably smaller by using dynamic linking instead of static linking. Dynamic linking simply means that your program loads code from a runtime DLL instead of linking common code into the EXE file. To enable dynamic linking, add the -tWCR switch when you compile like this: bcc32 -tWCR bcc1.cpp As you can see from this picture, the sizes of all the files are much smaller. The executable program will only run on a machine that has the Borland C Runtime Library DLL installed, however.
5. Running your Program
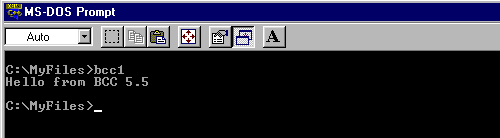
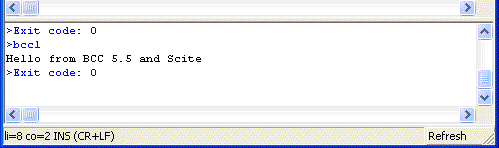
To run your progam, simply type it's name at the prompt, and press ENTER. You don't have to add the .EXE extension.
Using the SciTE Editor with BCC
SciTE stands for the Scintilla Text Editor. It is a small, free programmers editor you can use to edit and compile your C++ programs. Using SciTE is better than using Notepad, because: - SciTE "understands" C++, and color-codes your text while you type
- SciTE let's you compile your programs from inside the editor
- SciTE highlights syntax errors, and places you on the offending line
Once you have configured BCC, download the files Sc1.exe [about 200K] and the configuration file SciTEGlobal.properties, and place them both in your C:\BCC55\BIN directory. Then, add the following line to the bottom of your StartBC.bat file: START C:\BCC55\BIN\SC1.EXE Now, when you double-click your BCC shortcut, it will launch both the command window, which you can use as shown in the previous section, and the SciTE editor. Let's try it out with the same steps we used previously:
1. Create the Source
Double-click the shortcut and make sure that both your command-line and the SciTE editor start running. Then, open bcc1.cpp from the previous section and make a little change to the output message. You should see something like this:
2. Compile Your Code
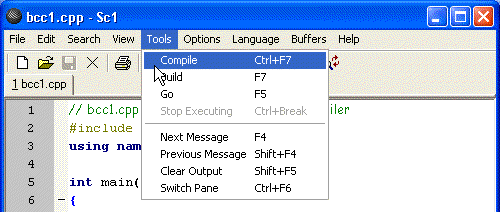
To compile your code, Choose Tools->Compile from the menu, or Press CTRL+F7: This will save your file and launch the Borland compiler, just as if you had typed bcc55 from the command line. You can see the compilation progress at the bottom of the screen:
3. Run Your Program
If your C++ program does not have any input [that is, you don't use cin, only cout], then you can run your program from within the IDE by selecting Tools->Go from the menu, or pressing F5. Your program will run and the output will appear at the bottom of the editor like this: If your program does require input from the user, then you must launch it using the command line window, as in the previous section.
4. Syntax Errors
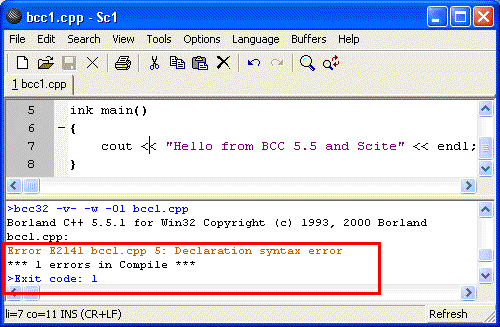
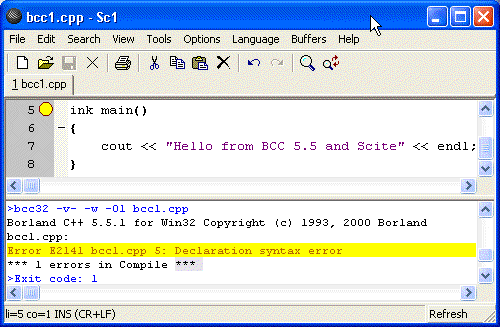
If your program contains syntax errors, the error messages will appear at the bottom of the screen. To see how this works, edit bcc1.cpp, and replace the int in front of main() with the word ink. When you compile, you should see a message like this: Note the error message which is outlined here in red. The error message tells you what file caused the error [bcc1.cpp], what line the error occurred on [5], and a brief description of the error [Declaration syntax error]. Even better, if you double-click the error message, SciTE will highlight the line of text containing the error like this: While it won't fix the error for you, it is much more useful than simply using Notepad.
Materials in this FAQ entry © 1995-2002, Orange Coast College. All rights reserved.
Any materials may be reproduced for non-profit purposes
|
![Selecting a title for the shortcut [Create Shortcut dialog page 2].](https://faq.cprogramming.com/images/bcc55/bcc18.gif)